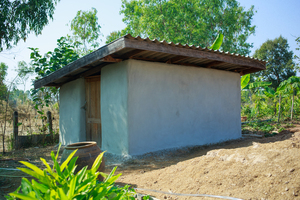
The photo shows the earthbag shelter design in our proposal to the UN. Earthbags are highly recommended since they’re tried and proven. However, in disaster areas bags and training may not be available, so it’s always good to have options. The emergency shelter idea explained here maximizes use of existing material and skills in Nepal in order to build shelter as quickly as possible. In this case the collapsed houses have stone rubble in abundance right where it’s needed. Using the rubble would greatly minimize labor. Builders in Nepal already know how to build mud mortared stone walls, so very little training is needed. There are no hard to find materials — the primary materials are commonly available plastic mesh and cord.
Summary of mesh reinforced stone walls: This new shelter idea is basically mud mortared stone walls wrapped vertically around the wall from bottom to top with strong plastic plaster mesh like this image. http://2.imimg.com/data2/CT/IJ/MY-2954699/plastic-mesh-250×250.jpg Mesh reinforced stone walls like this should be extremely safe up to say 6 or 7 feet high on small shelters. Buy mesh in rolls with holes about 3/4″ so the plaster will squeeze through the mesh and make it stronger. Note: chicken wire is not recommended for this application because it’s not strong enough. Another advantage is good subsoil for earthbags may be hard to get in some areas since it’s so rocky there.
Building process:
1. Cut the plastic mesh to length. Let’s say the walls are 6′ high and 18″ thick. The length of the mesh would be cut to 6′ + 6′ + 1.5′ +1.5′ +.5′ overlap = 15’- 6”. Maybe round up to 16′ to be sure it’s long enough. Lay the mesh on the ground perpendicular to the direction of the wall. Lay the second piece next to it with a 6”. Repeat for the rest of the building.
2. Build the mud mortared stone wall on top of the mesh as usual except lay some lengths of poly or nylon cord on the stone wall about every 16″ apart horizontally and vertically. They should extend (hang) about 6″ from the wall. Fill in gaps between stones with mud mortar before tying the mesh.
3. Wrap the mesh up and over the top of the wall, pull together tightly and tie together with strong cord or twine. Tie the other cords that are dangling on the sides of the wall to the mesh. The finished ties will form a grid 16″ apart in each direction. Be sure the mesh continues around the corner as shown in the blog post Summary of Earthquake Resistant Earthbag Building Methods since the corners are one of the weakest areas in earthquakes.
4. Plaster however you want. Cement plaster is strongest. Earth plaster will work on small shelters.
5. You could add a wood board on top of the stone wall that will make it easy to attach roof rafters. If so, wrap the mesh over the top of this board to help hold the roof on and make the walls stronger.
6. Build the roof as usual. I assume there will be some salvaged boards from the demolished buildings.
Note how the shelter can be enlarged as shown in the UN proposal. The shelters can be gradually turned into permanent houses (transitional housing) or built next to where the main house will eventually go and used as emergency shelters, animal pens, etc.
