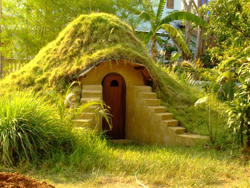
In a previous blog post about Earthbag Tornado Shelters I suggested building them for profit. Four years later the same advice is still valid. The marketing process should be even easier now since earthbag buildings are much more common. One key selling point is the cost. Most commercially available tornado shelters cost at least several thousand dollars. The materials cost for earthbag tornado shelters is around $300. That means almost pure profit for the builder.
The other most significant factor is strength and safety. Militaries around the world have built with sand bags for centuries because they are bullet and blast resistant. Domes are the strongest shape in nature, so these earthbag tornado shelters will keep you and your loved ones safe if a tornado or hurricane should strike.
The earthbag dome plans are still free at Instructables.com and Mother Earth News. The plans are so popular that they won a ‘best of’ Instructables award and were featured in a book by Instructables.com. That’s a big selling point if you’re doing this for a living – you can tell potential customers that these domes are extremely popular. Besides being published by Instructables.com (on their website and book), and at Mother Earth News, hundreds of websites have mirrored the content or wrote stories about these earthbag domes. To this day they remain the most complete free earthbag dome plans available anywhere.
Here are a few tips for building your own low cost earthbag tornado shelter. The article and websites linked above have complete building details.
– Build above grade on high ground that slopes away in all directions if possible to reduce risk of water getting into the shelter.
– The size shown (8’ interior diameter) is a good size for most small families and most situations. That means you can follow the plans exactly and not have to change things around.
– Earthbag tubes are faster and easier than laying bags. Many of our articles show the use of bags because they’re more commonly available and can often be acquired recycled. But tubes are the ultimate if you can get them. The best choice of all is raschel mesh tubes. Plaster sticks to the raschel mesh better than any other earthbag material, and raschel mesh is typically less expensive than poly tubes. Search our blog for extensive information on building with raschel mesh.
– There is no need for the living roof. Living roofs are a lot of extra work, extra expense and require ongoing maintenance year after year much like taking care of a garden. Most people will not want to spend the time and effort to maintain a living roof like this for years. They’re definitely not recommended in hot dry climates.
– You could significantly reduce the size of the buttresses or even do away with them altogether if you don’t use a living roof. They’re not needed if you don’t have 20 truckloads of soil on top.
– It would be much easier to plaster the top of the dome with cement plaster instead of making a living roof. I would wrap the top of the dome in heavy plastic first to reduce the possibility of roof leaks through plaster cracks. Plaster typically develops small hairline cracks that water can seep into and cause moisture problems. Inspect the dome yearly before the rainy season and apply thick paint or a sealer to any cracks.
– You could make a smaller, simpler eyebrow above the door if you’re not doing a living roof. The easiest way to do this is to pound ½” rebar into the bags that project down at a slight angle above the door. Connect the ends of the short rebar with a longer piece of rebar and cover the whole thing with one or more layers of hardware cloth or stucco mesh and plaster.
– Use a strong door with a steel bar inside that can withstand hurricane winds.
