The blog post the other day about cast in-situ adobe was quite popular and so let’s explore a variation of this method developed by Abe at Vela Creations.com. I consider Abe’s Tblocks a major contribution to the natural building movement – even good enough for a major magazine article. Keep reading to learn the details.
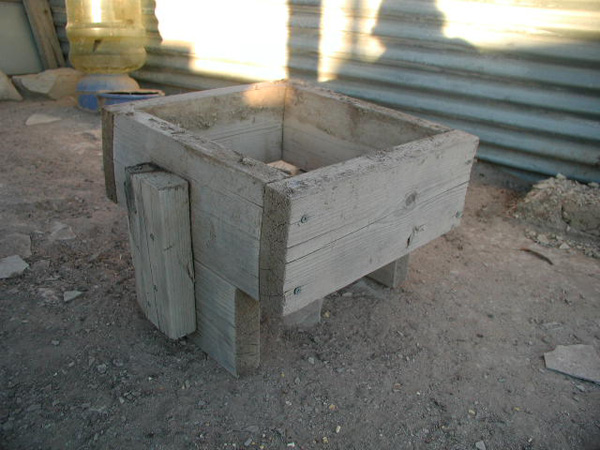
Advantages include no need to buy forms with his method. He made the forms with scrap wood. The interlocking feature creates a strong wall, even though it’s just made with mud. One option for those in wetter climates is to add soil stabilizer to the mix for greater moisture resistance. (Search our blog for keyword ‘stabilizer’ to find previous blog posts.) Now, let’s hear Abe explain how he’s been building with a cast in place adobe method he calls Tbricks.
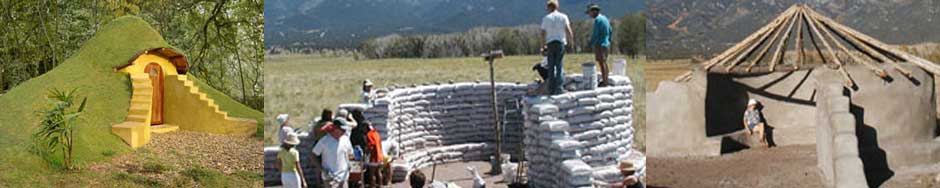
“We built our first home with cast in-situ adobe using homemade forms that bolt together. Two people can set them up in a few minutes and pop them off just as quickly. We made the form come apart from the sides, so we could use remesh to reinforce the wall.
We eventually migrated to a more refined version, called the T brick. Info on this page: http://velacreations.com/howto/adobe-walls/
With regular adobe construction, you mix it, make the blocks, and then cure the blocks for 28 days. Then you make the house. With Tbricks, you pour right on the wall and they cure in place. So you save at least 28 days. You also don’t have to lift the material multiple times, so you save a bit of your back, too. The mixing and pouring will be similar time for both methods.
The Tbricks are faster than bigger forms, like the FORMBLOCK system, because they just slip off after a few minutes after the pour. This also allows you to have fewer forms, because you don’t need enough to make a whole level, just a few bricks.
We liked the method and tried different sizes. It’s deceivingly simple, so you don’t realize the potential until you play with it a bit.
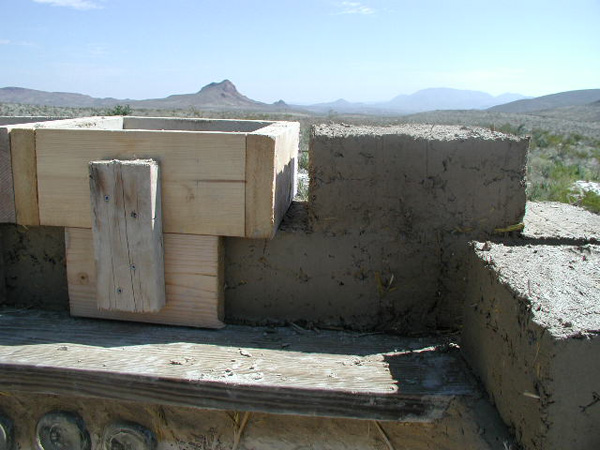
The best form for our adobe was an 8″ thick course, using 1X8 lumber for the form. This makes a 2″ gap between bricks, which you can still fit a hand into to pack the material down. This was the tallest brick that enabled the form to be lifted off a few minutes after pouring without the mud slumping.
Width is dependent on climate, usually 12″ is sufficient. For length, the best way to use this is to make the Tbricks (plus gap) a standard size so that each course is a full set of forms. 1ft or whatever is easiest, 18 inches was the max before we saw the form boards bow a bit. You need to pack the material well in the form.
I never made corner forms, but it could be done. We just used a few scraps to do a quick corner, again, just holding the mud for a few minutes, until it could hold its own weight. Sometimes, we would just stand there holding the corner boards ourselves for a few minutes as we’re taking a break.
It needs to cure for a month or more, that’s really the only drawback. [Note: this time frame could be shortened if you use a stabilizer.]
The T brick molds start out upside down for the first layer. For the next layer, shift 1/2 a brick so that the form is centered over the gap. Pour the brick, wait a few minutes (max 5, I think), then slip the form off. If you figure out your working rate, then you make enough forms that when you pour the last, the first is ready to slip off. Just a guess, this is probably 6 forms or so. The forms move like a caterpillar over the whole course. The forms self-level somewhat, because the side flaps keep it going straight up.
We never did more than 1 course a day, but it could be done, depending on your mix. 2 courses is probably the max per day. We would stick our fingers in the top of the brick to make it really textured to “grip” the next course above.
No cracking, it’s simple to do, and you only need a few forms to get started.
I like it just about as good as anything else. For people that have adobe at or near the building site, it would be easy to knock out a decent room in a week or so. We always did a draining gravel trench foundation with a rock stem wall for adobe, but it’s pretty flexible to fit whatever foundation/site prep you do.
I think the little building in those photos, which became our battery/power house on that place, cost way less than $100. In fact, just about everything on it was scavenged from surplus or junk sources in our area. I bet we had less than $20 in that.
Here’s more photos of it: Flickr
I still have those Tbrick forms, but I haven’t ever used it again, because we don’t have an adobe source here. Those forms are now some 13 years old, and could be used to build a house tomorrow, if needed.
In-situ adobe is the perfect material for someone who has no money, but a little time and effort with adobe nearby. It’s a forgiving material that goes up faster than cob (because the drying/setup times) or regular adobe (which has several months and lots more lifting/moving bricks).
Also, we put up more photos of the Tbricks and also the other styles, which is similar to the formblocks system. These came apart from the sides, but needed a bit longer to set up, but it allowed us to reinforce the wall easily (probably not needed).”
Thanks,
Abe
Vela Creations.com
Hi, dont you have problems with shrinkage whn drying blocks in situ?
I have an heavy clayely soil and my adobes dont crack (with plenty of straw), but do schrink 2 cm per 40 cm brick. I think using this method in place I could have problems with schrinkage ? . Adding sand is not an option because of transport cost.
Soil conditions and results are very variable in any type of earth building. Testing/experimenting is always required.
I have been reading about these T blocks for several weeks, as they and soil cement seem to be a solution to my problem. Questions; if using a mixture of sifted soil that is high in clay content, and portland cement as a stabilizer, do you think this could be poured as-is and not require a finish coating of stucco or ferro cement?
Also, this project is a barrier wall, intended to at least slow down the incoming gunfire I’m getting from “neighbors”. If using portland cement to stabilize, and blocks about 18-20″ thick, would I need a separate footer, or would they be self supporting like bin-blocks? Thanks!
That could work, although you’ll use quite a bit of cement. Seal the masonry wall when finished because cement absorbs moisture. Build a rubble trench foundation to carry the load.
how deep of a trench should there be for this? Ga red clay is like concrete, even after several days of rain, its hard as concrete. I’ve seen people build walls with those large concrete blocks, like they use at nurseries to hold bulk stuff, no foundation used. I’m thinking if I made blocks similar to those,(but yeah, much smaller) they would be self supporting. I know I’d have to use a rich mix, but this would still be cheaper then a heavy poured foundation.
A rubble trench foundation is generally a good idea. Protect walls from splashing rain.
I wonder if I used soil cement for a base foundation as well? They use it for roads so why wouldn’t that work here? If I till down about 6 inches (if you can till down that far in Ga red clay) add cement and till it in good, wet it and tamp it, it would have to be a pretty solid foundation. I plan on going up about six feet, just to afford some cover mostly while sleeping. Thoughts? Thanks!
Try it and see how it works. Rubble trenches with French drains help prevent water building up under the walls as well as increasing compressive strength.
This is a brilliant method and something that I would like to try! Q1:Is it possible to cast the bricks seamlessly in a given layer? Once the first brick is cast using your form, can the next brick be cast using a three sided form so that it seamlessly attached itself to the first brick? I would imagine that this would save the work involved in filling in the gaps between the bricks. Q2.If I am prepared to leave the form in place for a longer time, how high can the form be? (this question is just for academic interest)Q3.Another thing that I would like to do is to push short lengths of scrap metal rods or pipes while casting the brick so that a length of it sticks out and will be embedded while casting the next layer of brick. Do you think that bamboo sticks can also be used for this? Thank you in advance for taking the time to reply!!!
Maybe Abe will see this and give his opinion.
Q1: The gaps are a key part of this design. They help lock the layers together. But yes, you could make long forms and pour adobe in-situ. However that requires building custom forms which requires more wood, etc.
Q2: Thicker layers (taller courses) would take longer to dry. He tried different sizes and this is what worked well for his soil.
Q3: Bamboo rots pretty easily and using it as reinforcement in adobe is not recommended for durable, valuable structures such as houses.
I don’t know maybe I am missing something, but I don’t particularly see the peculiarity of this technique. You can easily control the thickness of the wall with the form, but a part from that I can’t see the difference between this and a cob wall. It is about putting the wet mix directly into the wall exactly like for a cob wall. So why to bother with the form? More over I see a good reason to let the adobe to dry before using them: they will not shrink in your wall but before, during the drying process. In my opinion there is not time saving at all, rather opposite: if an adobe brick will take a month to dry out in the field, 5 sides exposed, it will surely take longer to dry in the wall where only 2 sides are exposed. Once you have all your adobe dry you can potentially build the house in one day, with the T-brick probably you cannot do more than 2 rows per day. Please correct me if I misunderstood something about this technique.
There’s a big difference between this and cob. They use a different mix. Cob has more straw and is stiffer. It takes longer to mix. Adobe mud can be poured/placed directly into the mold. The molds create a flat, uniform surface that most people desire. (Although I don’t mind a slightly irregular surface.) Cob takes WAY more time overall — months compared to say 10 days for T-bricks due to the wall building method. Cob is ‘stitched’ together by pushing and shoving like kneading dough vs. just putting the adobe mix in the mold and shortly thereafter pulling the mold off. Traditional adobe takes an extremely long time in part because you have to laboriously handle the bricks so many times. With T-bricks you handle the soil mix one time.
You make a good point though about the drying process. You would want to test your soil to make sure it’s suitable. Some soils are prone to shrinkage and cracking. But Abe has shown with his prototype structure that cracking is not a problem with good adobe soil.
And no, you can’t build an adobe house in a day. Remember you still have to lift all those heavy bricks, make mud mortar, set the brick, check for level, etc. There’s much more labor in traditional adobe due to all the extra steps.
Email comment from Abe:
It is a very simple technology with profound potential. I always wanted to make metal forms, but never dd. You could make them lighter and they slide off even easier than wood. Another thing is a board on top of the brick to make a “keyway” for the next brick or reinforcement. They keyway could be useful if you wanted to add reinforcement, like rebar, you could drop in reinforcement, and it wouldn’t interfere with the forms.
The keyway on top is interesting. I had mentioned adding a beveled strip of wood on the ends of the forms to make a keyway. I think the keyway on top should be made with metal so it doesn’t break. It would be very easy to pack mud around the strip and then strike if off level.
there is a similar method used in India called alker, where the soil is mixed with gypsum in a large form and after setting up, place in a wall nearby.
We’ve covered alker before on this blog. It’s one of many possible types of material that can be used in the Tbrick forms or other types of forms. The best option is to use what’s locally available.
Owen, in a reply you made to a comment on the original in-situ adobe blog post, you said: “Everything changes though when you start factoring in codes. They won’t let you build your own molds and use an unproven design.” Does this apply to Abe’s T-bricks as well? The power shed he shows in the photos linked above is not a living dwelling, but how would one go about using T-bricks to build a house to live in? Thanks!
Small outbuildings such as storage sheds under a certain size are typically exempt from codes. In this case Abe lives on a ranch and so the codes are probably almost nonexistent. If you have codes, most likely they will follow the New Mexico adobe building codes that you can find free online.
Thanks,Owen. And, thanks to Abe for innovating and sharing! Of the earth-build techniques I have seen, this is the one I can most easily envision this middle-aged fugitive from corporate cubicle life actually doing! :-)
I agree. It’s a top choice. One of the best of all natural building methods. Hopefully someone will do a magazine article to spur things along and then someone will write a book. This information needs to be published far and wide. Most adobe builders will likely keep doing things the same old way unless they learn of this improved method. I see no disadvantages to T-bricks in comparison to regular adobe! Usually there’s a trade off of some sort — more expensive, special machines, etc. But not in this case.
Good day
This method is coming close to the rammed
Earth system, Isn’t it?I gues it’s cheaper because
you don’t need all the formwork.
How would the two systems compare?
Albie
It’s actually very similar to traditional sun dried adobe except the blocks are cast directly on the wall. There is no ramming. Just push the mud into the form and level it off.
This is really cool – never thought about casting them in position.
“I think the little building in those photos, which became our battery/power house on that place, cost way less than $100.”
That’s incredible.
I wonder if you could cast mosaic tiles into them during construction? I’m a sucker for mosaics (Proof: http://www.thesurvivalgardener.com/index.php/2013/02/26/a-hugelkultur-cinderblock-raised-bed/).
I’ve studied alternative home building and one day hope to build my family a new house. Soon, soon!
Yes, this is dirt cheap construction for sure. The mud bricks would be virtually free if there’s adobe soil on-site. The main costs would be the foundation (could use earthbags/gravel bags), roof, doors, windows, mechanical. No plaster needed if there’s an adequate roof overhang and the base course is raised safely off the ground. The forms could be reused for years.
Mosaics would be tricky if you’re casting them on the vertical face of the walls. Is that what you want to do?
We put bottles into the walls for certain effects, and also small forms to makes indentations in the walls.
Tiles might be hard, you need an anchor into the adobe.
But you can put rocks and other objects right against the form. We usually put a small plastic bag on the face of the object to avoid any adobe on the face of it, and easy form release.
You could put vertical strips of wood inside the forms to create designs like grooves.
Abe: Have you considered writing an ebook about this? You’d first need to build a guesthouse or something nice to document the process in detail and get lots of high res photos. The same material could go in a magazine to draw more attention to this building method. I know you’re focused on your garden, but this is something to think about.
Yes, I think an ebook would be good for this, and I’ve put it on our list to do. We had planned to do a small guesthouse here, and it would be perfect for that, though we probably won’t start until the Spring. I need to find a close deposit of adobe!
Also, for the wooden inserts, we did that to make little shelves and niches in the wall. Cover the wood with plastic or oil, and it works great.
Excellent info! Thank you so much for your blog and everything you do.