For many years I have wondered about the effectiveness of various products that advertise that they can insulate roofs and walls by simply painting them! The technology is said to stem from the science (developed by NASA) of protecting space vehicles by coating them with tiny ceramic spheres that reflect heat, so that they don’t burn up when re-entering the atmosphere. Some products consist of an additive for paint, while others are specially formulated paint.
When I realized that I wanted to insulate the 1940’s adobe house I had bought, I began to wonder whether this might be a simple solution to accomplish this. In researching this possibility I discovered that there were conflicting opinions about whether such a paint could work. The manufacturers claimed that many tests have proven their effectiveness and there were some testimonials from individuals or businesses that made similar claims. But I couldn’t find any independent studies that I considered actual validation of the concept.
Not being willing to proceed blindly with painting my entire house with expensive paint on the assumption that it would improve the thermal dynamics of my completely thermal mass walls, I decided to conduct an experiment that would accurately inform me exactly how effective the paint might be. I conceived of a situation that would simulate the thermal mass walls that were left open to the ambient atmosphere over several days. There would be one setup painted as prescribed with the insulating paint and then a second control setup that was identical, except without the insulating additive. Embedded within each of these would be a wireless thermometer probe to keep track of the separate interior temperatures.

I found some perfectly uniform 16’X16″X3.5″ concrete blocks for sale at my local building supply store quite cheaply, so I bought ten of these. Next I acquired the insulating additive (Insuladd was the brand name) and used some exterior latex paint that I already had on hand. I thoroughly mixed the additive to some of the paint and kept some of it in its original form for the control. Then I painted half of the concrete blocks with the insulating paint and half with the control paint, applying two coats of each.
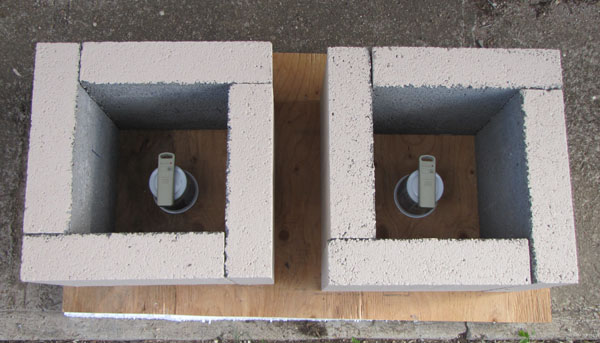
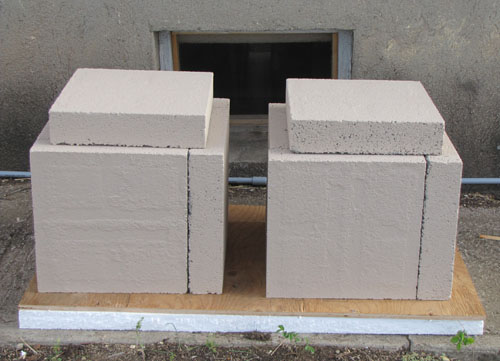
After the paint had cured, I first set up the experiment in the shade of the north side of my house. I arranged the painted blocks on top of a sheet of plywood that was insulated from the concrete sidewalk below with 2″ of expanded polystyrene insulation. Suspended near the center of the cube, resting on some plastic tubs, were the thermometer probes. A cap of the same painted blocks was placed over this, sealing the interior from most air intrusion. Then I could easily monitor the temperatures of each cube from my office where the thermal readouts were located.
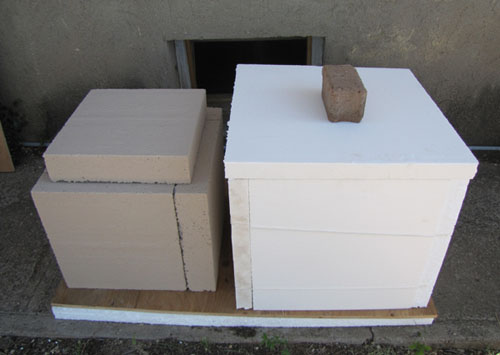
After a couple of days of collecting this data, I decided to repeat the experiment, but this time with the control being the same cube with non-insulating paint that was covered entirely with the 2″ expanded polystyrene insulation. This I thought would give a good comparison of the insulating paint with a known R-value of common insulation (R-7.7).
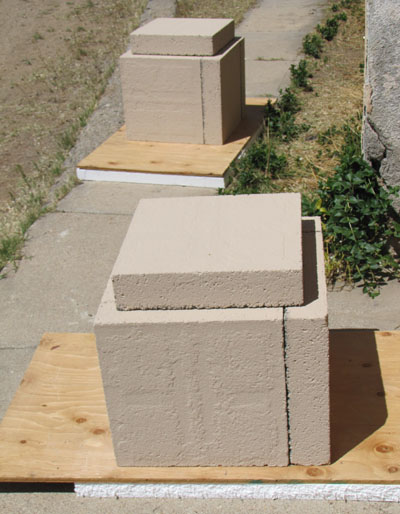
After I ran this experiment a couple more days, I decided to repeat the entire set of experiments in an open, sunny area on the south side of my house, just to see if direct sun might make a difference in the performance.
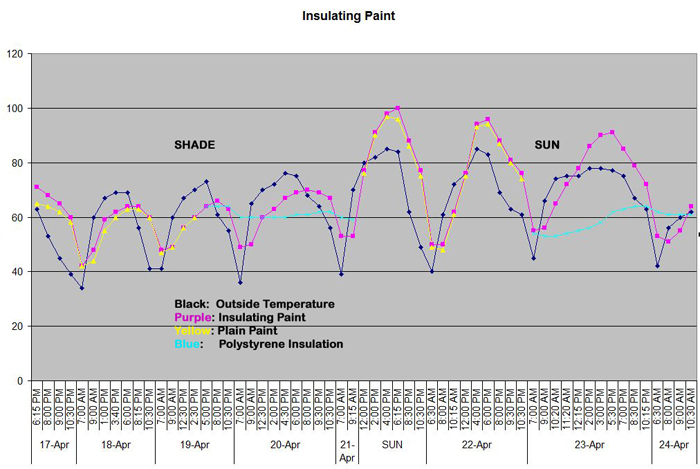
Finally, after about a week of collecting all of this data, I was ready to dismantle the experimental materials and graph the results of the experiment. It was obvious to me that, as I monitored the temperatures, that the insulating additive seemed to have little noticeable effect, I would say that the scientific results, as shown in the above graph, corroborate this. The day and time are indicated along the horizontal axis, and the temperatures (in Fahrenheit degrees) are shown on the vertical axis.
The second half of the experiment in the sun definitely reflects the higher temperatures reached, as would be expected. As you can tell from the legend, the dark line represent the actual recorded air temperatures, while the purple line shows the temperatures inside the box that was painted with the insulating paint. You can see that those temperatures basically fluctuate consistently along with the outside temperature, although there is a bit of a time delay. In the shade the inner temperatures were lower than the ambient temperature, and in the sun inside temperatures were higher.
When you look at the yellow control, you can see that it nearly perfectly mirrored the data from the insulated paint box; in other words there was virtually no difference! But if you look at the blue line of the polystyrene insulation, you can see a marked difference: the line from this experiment was much flatter, showing very little variation in temperature over the entire week’s experiment. In other words, the polystyrene was effectively insulating the cube from the ambient temperatures. I consider this rather conclusive proof that, at least in terms of insulating a thermal mass material like concrete, the insulating ceramic beads (at least the brand that I used) have no noticeable effect, whereas common polystyrene insulation has a considerable effect.

While I was excited to see an actual experiment rather than a review/anecdotal, and the effort and detail is outstanding, I was surprised to see that the structure is not sealed together. The blocks appear to be simply placed up against each other? And there is no bottom block.
The issue is that even a tiny pinhole will equalize interior and exterior airspace due to osmosis over time. The same is true for particles like smoke etc. Here there are many ways for air to get into the chamber. A way to think of the issue is that the chamber is unweatherized and leaky.
So what would be needed for a thorough test I think is a tightly sealed chamber:
1-Using mortar to connect the “wall” blocks to each other and to an additional floor block. And cover the exterior connection seams with the control paint or insulating coat.
2-The “lid” block and mating top surface of the wall blocks be fitted with a wide flat gasket (silicone rubber sheeting or sheet rubber) caulked on evenly so that when lid and walls are pressed together they seal snugly (but can be pulled apart again). Another option would be to glue refrigerator magnetic sheeting material on. The porous surface of the cement could also be “filled” to make it smooth for better adhesion and seal. (filled with any of the following: cement, spackle/putty, plaster, caulking or paint with some kind of filler)
3-Also the interior surfaces should be painted/sealed if not already because cement is highly porous, causing some temperature exchange within the cement itself.
But I applaud the diligent data gathering, presentation and hard work. From what I have read of anecdotals, people seem to get drastic reduction in heat of things like corrugated sheet metal shed rooves as measured by temperature of the underside when they coat the exterior with insulating beads in paint. This should affect interior air temperature significantly because metal absorbs heat. Similarly shingle roofs with petroleum shingles absorb 85% of solar heat, whereas a coat of white paint can drop that to 10-20%, and the most recent discoveries have produced numbers as low as 4.5% (calcium carbonate) to 1.9% (barium sulfate).
Of course that’s reflectivity of radiated heat, not insulation from ambient air temps, but on a hot day it makes a huge difference to air conditioning if you’re simply cooling air rather than fighting a heat source like a hot roof. Roofs can go down from 150f to 90f.
And after the night cools off a hot roof/attic or exterior walls can continue emitting heat that they absorbed from the sun for many hours, making the house hot long after it needs to be.
Thank you for this well thought out and detailed analysis.
So in your opinion, will it make a difference on an exterior wall that gets direct summertime sun and heat?
The wall is made of painted fiberboard…on a Mobile Home. Thank you.
Based on the results of this experiment, I would not expect much insulation from the paint alone. I did go ahead and use the paint on the exterior mental window frames of some single pane glass and the metal felt a bit cooler to the touch when left in the sunlight than is was without the paint… so in that situation there was a slight improvement.
Please tell me if you made the test directly on wall which already have a paint but an old one. What paint did you use and put this insuladd powder.
My test are different than Yours and I have other results. I have made few test and for me it is OK. The difference it is around 2 degrees after 1 paint but paint on the old skimming not directly on the bricks like your test.
The tests with the cement blocks were done without any prior paint. That paint was a standard commercial exterior latex paint. I also painted a metal bar that had been painted before, and that seemed to work better. When I placed two bars in the sun, one with Insuladd and the other without, the one without was much warmer to the touch after sitting for an hour in the sun.
I think you missed one more thing to secure your experiment. That is, you have placed both subjects (i.e. concrete boxes) on a plywood sheet, a part of which is exposed to atmosphere. That affected both inside and outside of the subjects for your experiment by thermal conduction. I’m not sure which subject is affected more in its favor, the one with the insulation paint or the one without, though.
Nice experiment, great preparation and effort. BUT… as you can see from insuladd website http://www.insuladd.com/store/ there are a lot of fakes around with the same name. Have you used the real one? This is the main question!! The second objection I have is that these ceramic coatings are NOT intended as insulating but as reflecting heat. The insuladd name itself is quite misleading, (probably part of a marketing strategy to be more easily found on the web). This makes the “shadow” part of your experiment totally irrelevant because in shade there is much, much less radiation to reflect. So, I would repeat the experiment using the real insuladd, only in full sun, and avoiding comparisons with insulating materials that obviously represent a different story. And finally, as others suggested, I would switch the probes between boxes every couple of days to compensate for sensitivity/precision/calibration issues. Great job anyway! Keep going!
It was real Insuladd that I used. Thanks for the suggestions.
Thank you so much for doing this research and for letting me know the name of the product
Would you be willing to name the name of the additive. That way companies could not say it wasn’t theirs.
The insulating paint that I used was Insuladd as an additive to commercial paint.
Also, forgot to mention. Painting the EPS insulation the same color as the control would add one more layer of exactitude to your scientific methodology. I’m confident it won’t make any significant difference from your original insulated test, but painting the EPS prevents any arguments claiming the white color of the EPS insulation was the cause of the temperature differences instead of the insulation. Which would be an even bigger BS argument than the thermometer calibration argument. The paint would dot every I and cross every T.
Still, don’t let my hair splitting distract from your awesome experiment.
Now THIS is an absolutely G-R-E-A-T posting. One of the best postings all time on this blog. Which is saying alot since there have been a multitude of outstanding posts here.
Well thought out experiment. Well executed. Clear results that will be difficult for anyone to argue with.
Kelly, you are a smart man.
The only ‘possible’ argument I can imagine the manufacturer of the paint additive claiming against your experiment was that your two thermometers were not accurately calibrated. I call BS on this lame argument, but it’s the only argument someone might possibly make.
If the thermometers were both put in the same box for an additional day, you could prove that both thermometers track together and are at least calibrated the same relative to one another and that would completely crush even the lame calibration arguments.
Please keep doing these kinds of experiments.
Great stuff.
THANK YOU for taking the time, energy and expense of doing this research for the good of all.
Thanks for doing this experiment Kelly! This is what I suspected.