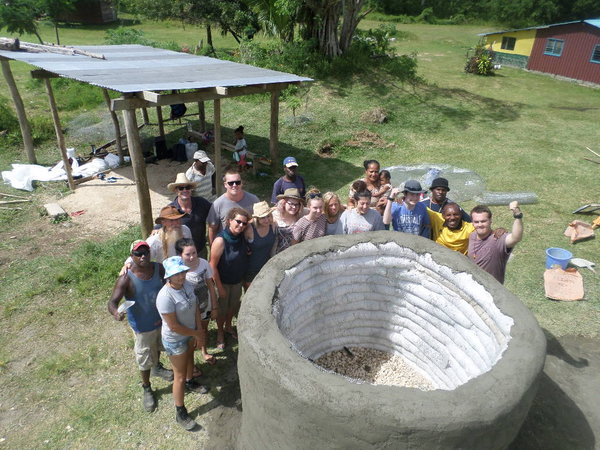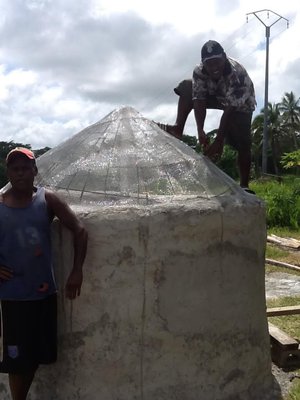
We’ve nearly finished an earthbag water tank with narrow tubes that cost $200 in materials. Plastic tanks this size retail for around $1,350 in Vanuatu, so this design costs far less than the main competing product. It won’t blow away in a hurricane, break down from UV rays or taint the water with plastic chemicals. Our water tank includes a domed ferrocement top that’s exceptionally strong. It can be built in 2-3 days by four workers with minimal skill, although plastering skill is very helpful. There’s a huge water shortage on the islands here in Vanuatu, as well as many other places. Those who learn this method could make a lot of money selling water tanks since demand is high and cost of labor is cheap.

Our polypropylene tubing was purchased from Bundaberg Bag Company, Australia. Specs: 14-1/4” (36cm) wide when measured flat and empty, wall width before plaster 11-3/4” (30cm) x 4-5” (10-13cm) high. Flatten the wall surfaces somewhat to save on plaster and the wall width is then closer to 11”. Standard 18” wide tubing is best for most houses and other large structures, but excessively wide for water tanks. Bags such as poly rice bags will work, however, you will get gaps between bags that take extra plaster. Plaster mesh is not needed if you apply the first coat in the recesses between courses. The second coat covers the entire tank. The plaster that falls down inside will naturally make the floor with minimal effort.
Desirable water tank features: dome top to shed water so plaster doesn’t get covered with mold, ‘first flush’ pre-filter to flush the first water after a rain with dust and bird poop, removable strainer to screen out leaves and other debris, lid for strainer (covers strainer between rains), 2 lockable brass taps: one raised a ways from the bottom and one clean out drain on the bottom, overflow pipe, tie-downs to secure lid. Some people build a recessed area below the water tap for filling buckets.
Right now I’m loving the idea of water tanks. It fulfills my goals of spreading appropriate technology and helps meet an urgent need. You probably know that over 3 million people die every year from lack of clean water. Capturing roofwater is one of the lowest cost, easiest ways of obtaining safe drinking water and clean water for cooking, bathing, laundry, pets and chores around the house. For many, a clean water supply is the difference between life and death.
Photo credit: Alexander Lahner
Instructors: Stefan Jost, Josaphine Porteous, Jordan West
Lorien Novalis School, Dural, NSW Australia

What height did you use on the photo?
The tank appears to be about 5 1/2 feet high.
Thanks for posting this. We are building one and I will share the pics… two questions.
Does the floor need rebar and cement like a typical poured concrete patio?
We will use two barbed wire strands, do you think we can make the tank larger? What would you recommend as a safe width and height?
No need for rebar in the floor but of course the slab floor is made of cement.
Start small to gain experience and gradually increase the size as your skill develops.
Hello Owen,
First thank you very much for the wealth of information on this blog. It is a real help.
I am in the process of designing an earthbag project on one of the islands off the West African coast. I have been reading on water tanks and how to construct them. However, on the island I am planning the experiment, houses have water tanks on the roof (more or less integrated in the structure. This is because the local water network is still something new and at times not so reliable. So the locals here have periodically their water tank filled for drinking, cooking, toilet etc. The water tanks are usually squared cement boxes with a hatch on top on the top layer of the roof.
Now, I was thinking of integrating one in the earth bag construction. Could I e.g. build a round house in which I use the leftover top space for the watertank? One the ground floor I would have e.g. a bath room and right on top of it, the water tank, integrated, with the same area space. Don’t know if I make any sense but have you seen something like this done somewhere? Is it overall possible? If yes, what structure and cement do I use to safely keep the e.g. 5 cube of water in the tank :). I am a big fan of natural materials so my preference is to use lime, sand, pumice instead of portland…
Almost anything is possible. You could build the tank in the attic or on the outside of your house. Just be sure to build a strong base to support the weight. For those who don’t have the necessary building skills you’ll have to rely on paid workers. Most likely they will insist on doing things a certain way with their preferred materials.
I am affraid that the only way here is portland cement.
If I were to rely on superadobe what kind of base would I need for a 5cubic ltr water tank in the attic? Wouldn’t the round earth bag structure with buttres below and a lime/concrete ringbeam right under the tank be enough to carry the load?
Yes, if you do it correctly. That’s where you might have to rely on local builders.
Could this be constructed or modified to be in or under ground? Love the idea though!!
Yes, of course.
About the plasters what did u mix and ratio to water to proof it? I am planning to make a fishpond using your method. Thanks.
More information on the ferrocement top (the only part not clearly explained above):
Cut a piece of 4″ diameter bamboo to the desired height and set it in the center of the water tank. Hold it plumb as someone else measures the distance from the earthbags to the top. Add extra for the ends. One end is bent over and goes in the bamboo about 3″. The other end is pounded 8″ or so into the earthbags. Our 1/2″ rebar was pre-cut at the building supply center at 1.5 meters so there was no waste. Bend the rebar with a piece of steel pipe as it’s secured in a bench vice, etc. Once you have one piece that fits correctly then make all the others to match. That way the shape is uniform. Insert the rebar. We put ours about 16″ apart. Add tie wire around the top of the rebar. We poured a little cement in the top to help lock it all together, although that’s not necessary. Add two circular pieces of 1/4″ rebar spaced so they reduce the largest openings. (You don’t want the mesh to sag under the weight of the plaster.) Tie chicken wire mesh on top (small holes). Then add a layer of 1/4″ mesh (hardware cloth). Add plenty of galvanized tie wire until all the mesh is close together. Now you can remove the bamboo center pole. Be sure to plan for an access hole so someone can climb inside and clean it once a year. Also plan how the gutter or pipe from the roof will enter the tank. Be sure all of the ferrocement mesh is covered inside and out.
Periodic cleaning: A brush and some bleach in a bucket of water works good. Rinse with a garden hose and the drain valve opened up.
Hello Owen,
I am so glad this was done finally! I would like to know if there is a pump used at all? For the top, it looks like a high cone style. Can a regular flat style be efficient to use? It would be great to see a simple plan on the how to with visuals.. :)Thank you for sharing!
The top doesn’t need to be that steep. Watch for tomorrow’s blog post for a less steep variation. But you don’t want it totally flat.
Not sure if I’ll draw the plans at this time since I’m busy traveling. Read the directions here carefully. Get some tubing and jump in and try it out. It’s really simple. Update: I just added more details about the ferrocement elsewhere in the comments section.
There’s no pump on this design, although you could add one of course if you wanted to pump the water into the house. On this one, water flows into the tank from the gutters. Then you open the tap near the base to draw water out. It’s all gravity fed.
Be sure to research ‘first flush’ systems to get rid of the initial crud that comes off the roof when it first starts raining.
Brilliant! I’ve been trying to figure out how to afford a cistern so that I could build our rain harvesting system, and now I know how I’m going to do it. Don’t know why I didn’t think of it.
What do they use to plaster or line the inside of the tank to make it hold water ?? glenna
Cement plaster, same as the outside. The finish coat inside is cement ‘paint’ that’s made with cement and water.