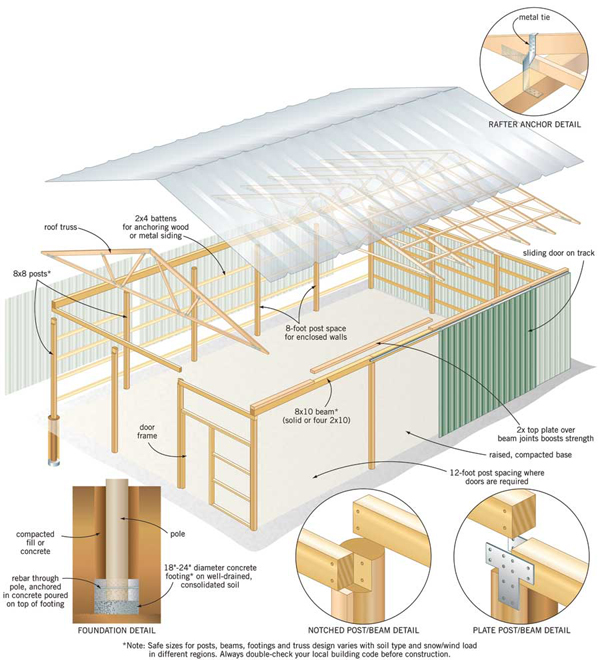
Put up a pole building for a fast, solid and cost-effective workshop, storage space or livestock shelter.
“If you need to add shelter to your homestead easily and economically, pole barns are right for you. They’re the fastest, most cost-effective way to build permanent, solid shelter to store equipment, house livestock, or function as a garage or workshop facility. You can even use the pole barn approach to build a year-round home. A big part of the attraction is simplicity. There are only four steps involved in pole-barn building, and the first one’s even optional! None of the work requires fancy tools or finely honed skills.
The steps to pole-building success are simple: Create a level base pad (if you want more than just the earth underfoot), set poles vertically into holes in the ground, connect them across the top with beams and braces, then put roof trusses on top. No need for a complicated foundation, either. Even in regions with cold, frost-prone winters, pole barns endure well with nothing more than the simplest connections to the earth. And if this weren’t advantage enough, pole barns also offer the option of using your own logs and rough-cut lumber for many parts of the job. The only thing wrong with pole barns is the name. This building approach is so much more useful than for building barns alone.
If you’ve never constructed anything large before, then a pole building is a good place to start. The illustration and information you’ll find in this article will equip you to custom build your own durable pole barn based on universal design and building principles. Most building authorities require simple plans for project approval, though many will accept hand-drawn versions. Agricultural extension services across the continent also offer basic pole building plans for free. You can buy fancier ones online. Either way, success ultimately comes down to the kind of hands-on know-how you’ll find here.
Read more at the source: Mother Earth News

30×60
Found your blog. This is a very good blog on Floor and Roof Framing Detail. I would like to thank you for all the information you give. Its really important to get the best details on Floor and Roof Framing. So thanks for sharing all that important information.
Thanks Owen
I was thinking of the same idea, simple post and beam supporting a roof structure and then using earth bags; however I’m not sure about completing the roof first, as it would make standing on the earth bag wall filling and tamping impossible once you get close to the roof. Would be nice to work under cover, though. Thanks so much for your web page and all the great info you share–love it!
This same point comes up over and over. The lower course of roofing (the area directly above the earthbag walls) could be held in place temporarily with a few screws. Briefly remove the roofing (one or two pieces at a time) as needed and replace as soon as possible. Finish the top of the earthbag wall like steps instead of doing one whole course at a time. Have tarps ready just in case it rains.
Sounds like a very well thought out plan! Thanks
Note the standard hardware (connectors/ties) that simplify and speed construction. A previous blog post has more info on post and beam hardware:
https://naturalbuildingblog.siterubix.com/post-and-beam-hardware/
Pole buildings like this work great with earthbags, straw bales, etc. They make getting a permit much easier. Also, constructing a frame and roof first enables you to work more comfortably out of the elements.