Caliche: calcium carbonate formed in the soils of semiarid regions.
“I sifted the caliche through a chicken wire sieve to get rid of the larger material. This leaves a good size aggregate for a 4-5inch think pour, thicker floor better against moisture too (when the pour is too thin less ,than 3″, the mix will crack more, when setting). I used string lines leveled with a bubble level for strings to keep the floor level (you can see it in one of the pictures). It starts drying very fast so its good to go by sections that are at arms length to burnish with a trowel as it hardens. This gives it a nice smooth finish, though a little rustic since it is not floated first with wood guide rails the way you would a concrete pavement. (this was easier for me since I was working on a round floor plan). As it dries keep an eye on it as it will develop cracks, just proceed to burnish over the cracks constantly and it will all even out as it sets completely. The caliche mixed with cement is not grainy like sand and is easy and smooth to burnish as if it was pure hydrated lime. Finally, I sealed it after a few weeks with a clear cement sealer (boiled linseed oil, is too expensive here). No rebars. The ratio is 4 five gallon buckets of sifted caliche to 1/2 bag (a 50kilo bag) portland cement to 1-1/4 five gallon bucket of water. The mix sets better if poured not clumpy but soft to very soft. Old edges blending into newly poured edges takes a little extra burnishing. All in all was SO EASY, no ramming.
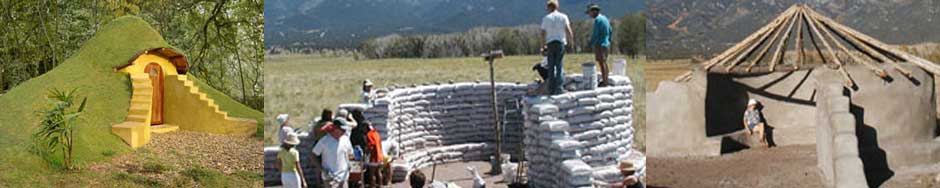
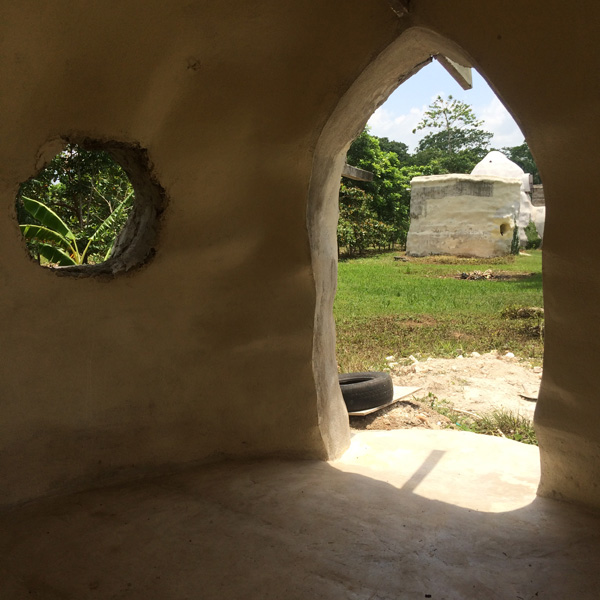
Keep in mind this floor is set on a base of filled tires that is topped off with compacted gravel [you don’t need the tires], then a thin layer of caliche ramped then the poured floor. This gives me about 14″ above grade. One floor in the smaller dome is only 2 months old. We are already in our rainy season and the floor is damp free. Caliche all around is better than anything here in the tropics against moisture problems. I built a 15′ diameter dome with clay and found it to be terrible with cracks. I then switched to road base then caliche and caliche unstabilized in the poly bags are superior in ramming and moisture retardation.
Things i would recommend.
1. A vibrater [plate tamper?]. This would get rid of the cracks when setting.
2. A bull float for burnishing instead of a trowel. This is a metalic float attached to an extremely long arm used in floating large areas.
3. Cement coloring [iron oxide pigment]added at the mixing stage. It would work well as caliche absorbs the powdered color and would give a nice worn look.
3. Wooden guide rails to give an even leveling when pouring.
4. Tile pattern could work with this if you have the forms as described in one of Owen’s earthen floor solutions.” See Eleven Earth Floor Methods
JNM
Will caliche work for bag fill I’m in far west Tx. There’s very little clay here. Can it be mixed with sand?
Yes.
i want to put down a floor under a 10 x 21 foot awning is out side would this kind of floor work ?
Sure, why not.
Hi Mitchell I live in calichi land and wanted to make a porch.do you think I can do this with only calichi.and no tanning the floor.just raw calichi
I meant a patio floor
I am building a 12′ X 12′ shed/minihouse on 6″ X 6″ skids. after our home is finished we will probably sell it. It can be used as a luxurious, insulated shed or a portable “tiny house”. MY QUESTION IS:
With the Advantech subflooring, would it be foolish to try a caliche or adobe floor as a finished floor? The Advantech is lifetime warranty & supposedly impervious to moisture but I could line it with felt paper or visqueen?
I would really like to try the adobe floor on something small before we go all out in our new home with it. Any suggestions from you GURUS are appreciated. I love your blog but haven’t been on it in a long while, so please excuse me if I am asking a question that’s been recently covered. Kudos!
Well, if it doesn’t work it could be easily removed and replaced. The drying time is very long. You could move in for weeks or months unless you dried it with a heater. Maybe an insulating floor with recycled wood is more practical?
I didn’t use the vibrator on this project, but we regularly use it when pouring any steel reinforced concrete pour at 3500 psi or more be it slab, beams, posts, monolithic walls, etc. You use it at the time of the pour, before mix starts setting.
Vibrator for stabilized mixes are the type that is a rod attached to a flexible cable in a hose housing. You dip the rod in the mix and turn on the motor. Used for pouring concrete in forms e.g beams. Takes out all the air pockets out of the mix. Then again might want to keep some air pockets in the mix for coolness and extra water barrier in the floor (speculating here).
JMarin
I haven’t seen vibrators used on floors (because it’s a slab). At what point are you using the vibrator?
Very interesting. Here’s a question Owen. As you know, I’m planning to build a Hobbit house and I want to use the same type tiles as in the movies throughout. My question is…..how would the use of mud work? With a couple to a few feet of scoria underneath…will it hold up OR should I only use cement? I “believe” you once told me for my rainy and snowy environment I should use 3 or 4 feet of scoria for insolation. Correct? Anyway, my thought is I should go with cement. Correct me if I’m wrong. Thanks for your reply and another great post WITH the other spot to view. That one was very helpful as well.
It depends on your personal goals and budget. Lots of people build earthen floors on top of tamped scoria. Earth floors take more time and effort and especially drying time. Some want the natural feel of earth under their feet and the irregular ambience. Concrete is stronger and faster, but also feels dead in comparison.