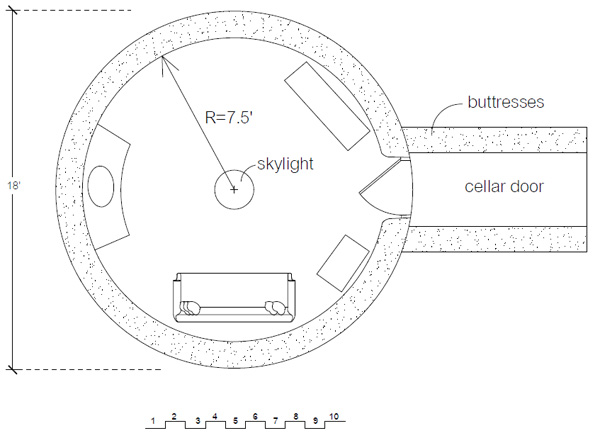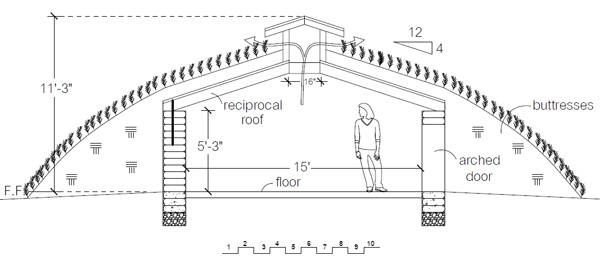
Our blog has quite a few free emergency shelters for various purposes. All designs can be found on this blog using the built-in the search engine. Free detailed plans for these shelters are on our Free House Plans page. I’ll add this latest design there if it proves popular. Leave a comment below if you’re interested in building this earthbag shelter.

This emergency earthbag shelter is designed for those who need temporary shelter, such as those who have suddenly lost their job and home. You may not need something like this now, but it’s always good to have backup plans just in case. This earthbag shelter is also suitable for developing regions, as a storm shelter, root cellar, seed storage, tool shed, quiet space, etc. It can be built in two or three weeks by one person, and is extremely low cost. The diameter and height can be adjusted to suit your needs. Almost no purchased materials are necessary. As one example, I suggest recycled feed bags from farmers or feed stores, or mesh produce bags from farmers markets. You can use galvanized wire for tying bags closed (about $2 for small quantity), salvaged rebar from a recycling center (cost varies), and 6 mil poly sheeting for waterproofing. Gravel or sand/gravel mix for lower courses could be obtained from a nearby gully or stream bed. Your mileage may vary, but I estimate the cost at around $200-$400 using the tips outlined here.
Roof: The reciprocal roof (more details below) consists of round poles (free from a forest) or rafters of milled lumber covered with decking material such as rough sawn lumber from a local sawmill, pallet wood (free) or small poles (free). The top is covered with several layers of 6 mil black poly plastic sheeting that extends beyond the walls about 8 feet or so to direct water away from the building, and then soil and plants added to create a living roof.
Bond beam: Emergency shelters with low walls such as this don’t need bond beams. The earth berm around the sides and vertical rebar pinning that secures roof poles would prevent the walls from spreading outward.
Soil for the earthbags, berm and living roof: I would build on a naturally occurring high spot. This would minimize excavation work and/or transport of soil, which is the hardest part. (I’m assuming the shelter will be built in a roadless area where trucks can’t get in.) Dig out the center and use the excavated soil in the earthbags and for the living roof. If trucks can get into the area, then great. It’s far easier to work with loose soil than dig it out of the ground by hand. Dump the soil next to the building site in 2-3 piles to reduce labor.
Other advantages of this earthbag shelter:
– Almost completely invisible once built.
– Small enough to be built under a tree canopy to help avoid detection.
– Extremely energy and resource efficient. Add some scrap foam board insulation around the outside of the earthbags in cold climates.
– This shelter could be heated with a tiny fuel efficient stove such as a rocket stove. (See Small Wood Stoves for Small Homes)
– Low cost floor options include tamped earth, gravel or pallet flooring. Don’t laugh, but a few layers of corrugated cardboard on top of pallets would work great. Our dog had puppies two weeks ago and we improvised a very cozy shelter out of cardboard. I stuck my hand inside early in the morning to check the temperature and was surprised at how warm it was with the dogs inside.
– Arched doorway is strong and requires no lintel. Use tires or a barrel for forming the arch.
– Use large enough diameter roof poles and you could add 1-2 feet of soil on top to survive most anything that might come your way.
– There are no windows, so you’ll want to build a cupola with screened openings for light and fresh air. Run the stove pipe out through the cupola.

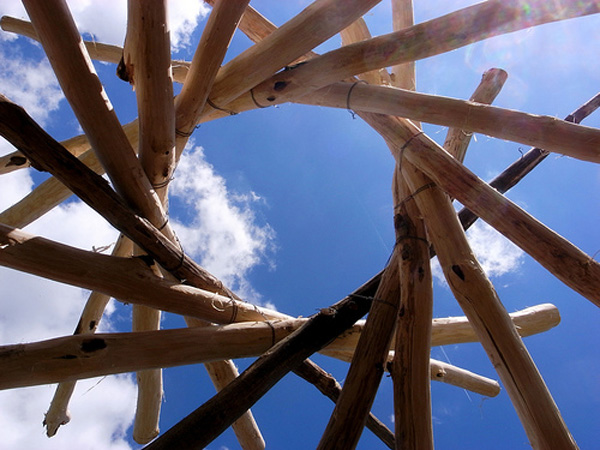
What is a reciprocal roof?
“A reciprocal roof is a beautiful and simple self-supporting structure that can be composed of as few as three rafters, and up to any imaginable quantity (within reason, of course). Reciprocal roofs require no center support, they are quick to construct, and they can be built using round poles or dimensional lumber (perhaps with some creative notching). They are extremely strong, perfect for round buildings, and very appropriate for living roofs, as well. The reciprocal roof design was developed by Graham Brown in 1987.”
Source: Check out Ziggy’s Year of Mud Blog – How to Build a Reciprocal Roof

Well, we’re in the throws of building, but still trying to figure out this roof thing. We’d like to do a reciprocal living roof, but we’re having a really hard time finding examples/instructions from beginning to end. Can you help point us to some good resources? We’d sure appreciate it. BTW, Our roundhouse has a 28ft. interior diameter.
Ziggy’s reciprocal roof instructions are the most detailed I’ve found. Search his site: Year of Mud http://www.small-scale.net/yearofmud/
Hi am interested in building earthbag building in Queensland Australia does anyone know of this being done before? Thanks
There are a few projects in Australia that can be found in a search engine. Some are profiled on this site. Some are kept private.
Awesome plan!
Earthen roofs are heavy, and would thus require either a good number of beams, or else some stout reciprocal members. if using wood rafters for a 15′ span, I’d open up the central opening, at least doubling the stated 1.5′, so as to not have to notch so excessively structurally.
How about a periscope?!
If/When someone is considering building underground or heavily earth bermed, and if someone lives in an area where there is even the slightest risk of RADON in the soil, I would recommend including a below floor ventilation system in the design.
These systems need not be expensive, IF INSTALLED AS THE STRUCTURE IS BUILT. You need not worry about ventilation fans during construction. Just build in the proper air barrier below the floor and the appropriate vent stack. Extremely inexpensive during construction, but much more expensive and a great deal of hassle to add on later if you discover it is necessary.
RADON may not be big factor for a shed, or a temporary shelter, but for food storage or long term shelter it could be a major health risk.
Here is a pdf that describes how to build a system for standard “code” type construction. This should be easily adapted to earthbag construction.
http://www.epa.gov/radon/pdfs/archdraw.pdf
That’s right. A layer of 6 mil plastic sheeting and some PVC vent pipe will take care of most situations.
Would love to see the details. Am interested in the reciprocal roofs. And it sounds like the best way to have a house ‘ underground ‘ here in Louisiana. Bet I could pass it off as a storm shelter to the code folks. glenna
Ziggy’s website has the best explanation for building reciprocal roofs. The basic earthbag information is free:
http://www.instructables.com/id/Step-by-Step-Earthbag-Building/
http://www.instructables.com/id/How-to-Build-an-Earthbag-Roundhouse
And yes, they would classify it as a storm shelter. But it’s hard to get code approval for unconventional structures such as this. That’s why we always recommend building in areas with few or no building codes.
It’s best not to build below grade except maybe in deserts. Sooner or later water will get in and flood the structure. It happens all too often. So, I would look for a naturally occurring mound or build on a high spot and add soil on top.
French drains, liners, and proper berming will help with floowing. It also helps if you can build into a hill.
With this design, I’d try to build into a south facing hill to get the solar gain as well. It would increase the cost a bit to add some south windows, but in my opinion, it would greatly increase the comfort level.
Jsut the sort of thing I’m interested in. Maybe mix it with the one you designed that as totally undeground? Partly below grade, still have the pond liner… That way you don’t have any obvious excavation site, you bag the earth you’re digging out. The hole that becomes the shelter is the source of the dirt.
That’s possible, but it’s prone to flooding. I just added a comment about this. But yes, you could do it with careful detailing.
How would you do the arch walk way, with earthbags?
It’s a typical earthbag arch like on my earthbag dome (article explains everything in detail): http://www.instructables.com/id/How-to-Build-an-Earthbag-Dome/
This topic is also in Doni and Kaki’s earthbag book.
How wide can those arches be?
6′ arched doorways are common.
This is VERY interesting. When time permits I’ll look at it in more detail. Keep it UP..