The current issue of Mother Earth News has this article written by Kyle Chandler-Isacksen with Conrad Rogue; photos by House Alive. What is shown here are excerpts; you can read the entire article at the above link.
Balecob is an infill technique that uses straw bales and cob to quickly create highly insulating, roof-supporting, and load-bearing walls without the need for wood framing for structural support. (Cob is clay, sand, and straw mixed with water.) In balecob walls, straw bales are stacked like bricks and stabilized by jamming cob into the seams. It’s a hybrid building technique that makes use of the best of both cob and straw bale construction, resulting in beautiful, natural, functional buildings. Balecob was pioneered by Ianto Evans and the Cob Cottage Company in Oregon. I (Kyle) learned from Conrad Rogue of House Alive, who uses a slightly different technique. My hope is that, as people learn about balecob, they’ll appreciate how much sense it makes and decide to give it a go on their own buildings. Because balecob is a blend of both cob and straw bales, it’s important to look at what each material offers the natural builder.
 Cob is strong and durable, and easy to shape however the builder pleases. It provides plenty of thermal mass, though it isn’t very insulating by itself. Because of its malleability, cob is useful for leveling stem walls and other areas, making it a great tool to use in concert with earthbag, recycled concrete (“urbanite”), or other irregular foundation techniques. Cob is usually sourced locally — sometimes even made from the soil removed from a building’s foundation trenches — and is accessible to just about any builder. Straw bales are less durable than cob, but far more insulating, and their uniform size and shape offer an easy route to rectilinear walls.
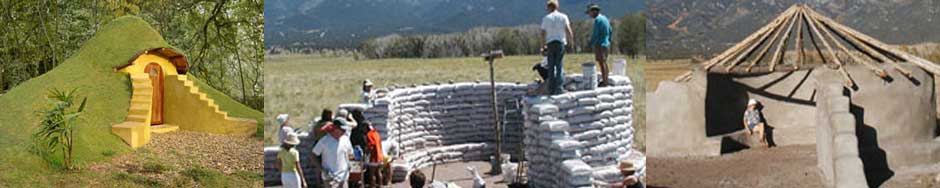
In short, cob is great for strength, mass, and curves; straw bales for volume and insulation. Both share low costs, fire resistance, and low tool and skill requirements; both also encourage community building projects. When we combine the best of both materials, we get the benefits of balecob, which is faster than either approach by itself; insulating and strong; and suitable for building curved and rectilinear walls. A balecob wall, from the ground up, has:
- Rubble trench. This foundation of loose stone, gravel, or “rubble” in a trench under the walls will provide support and drainage.
- Stem wall. A short wall of stone, earthbags, concrete, or other rigid, impermeable materials will bridge the rubble trench and the vertical walls, and protect the walls from water.
- Base cob layer. An 8- to 10-inch-thick layer of cob on top of the stem wall will even out any inconsistencies and make a smooth base for the straw bales.
- Bales and cob pillars. Straw bales make up the bulk of the wall, with cob “pillars” at the corners and intermittently in long walls for structural integrity. Gaps between bales are jammed with cob to hold the wall together and compress the bales.
- Top cob layer. The final layer of cob, typically at least 1 foot thick, will compress the bales further and provide a firm connection to the roof.
- Roof. Rafters are tied into the final cob layer, making the whole structure more stable.

Don’t skimp on the depth or tamping of the rubble trench. It needs to be as stable as possible, to avoid the walls settling and cracking later. The stem wall should also be built with care, and should be a few inches wider than the bales you plan to use, to allow space for layers of plaster that will make a plumb wall from the stem wall up to the roof.
Once your stem wall is up and mostly level, start building an 8- to 10-inch-thick layer of cob. Fill any gaps in your stem wall as you go, so you have a more level base for your straw bales. This layer will help connect the components of your stem wall, so it should cover the full width of the stem wall.
You can stack bales on their narrow or broad sides. Stacking on the narrow side will allow you to build a taller structure more quickly and use fewer bales, with a narrower stem wall and smaller overall footprint compared with stacking on the broad side. Stacking on the broad side will require more bales, but offer thicker walls that can be gently curved by bending the bales as you build. The insulation factor will be slightly lower than narrow-stacked bales — though still higher than conventionally built walls — and plastering will be easier. However you stack your walls, use only strong, clean, intact straw bales, and center them on the base cob layer.
Rub clay slip (a milk-consistency clay slurry) on all sides of each bale, and set the bales on top of the cob layer. This layer of slip will serve two purposes: First, it will provide some friction between each layer as you build, keeping the bales better connected as you go. Second, the slip will act as a primer, so it’ll be easy to smear the walls with a good base coat of earthen plaster.
Stack the bales so the gaps between them are staggered in each row, like you’d stack bricks (or Legos) for maximum strength. Bales can be cut and re-tied to fill short spaces. As you stack bales, construct cob pillars to provide lateral compressive support, hold the bales tightly together, and to structurally support the roof. Build a cob pillar at each corner of the structure; for spans greater than 10 feet, add a column or two along the wall. For example, on a house we built in South Dakota with 30-foot-long walls, we built 2-foot-square pillars at each corner, and another of the same size in the middle. On our small balecob pig hut, however, the corner pillars were only 1 foot square.
You’ll also need to thoroughly stuff all gaps and seams between the bales with cob as you go — we call this “cob jamming.” The cob acts like dozens of wedges, further compressing the bales and minimizing or eliminating bale settling. Bale settling is a common challenge with straw bale homes, and can lead to significant plaster cracking, decreased wall strength, and reduced insulation because of the air gaps created as the wall settles. Balecob solves these problems.
After the last row of bales is stacked and set, you’ll be ready to lay the upper layer of cob. This upper layer will have three functions: It will compress the bales further; level the walls and add any final shaping you desire, and attach the roof anchors to the walls. Make this layer at least 1 foot thick for larger structures (although we’ve gone as thick as 20 inches before, and on my small pig hut, I stopped at a mere 4 inches). Use the cob to level out any rises and depressions in the bale wall, so that the top plate and roof beams lie true. It’s very important to connect your roof to the mass of the wall to ensure a solid and strong building. We use “deadmen” and metal strapping for this purpose. A deadman is a piece of wood (usually dimensional lumber) set into and then surrounded by cob, which can serve as an anchor for anything you might want to support with the wall: shelves, stairs, benches, and roofs, for example.
In straight-up cob construction, we’d set metal strapping with deadmen into the cob walls 1 foot or more from the top of the wall, spaced about every 2 feet. Over the length of a wall, this gives numerous, well-anchored attachment points for the roof. We’d then attach the top plate or the rafters to the wall with the metal strapping. We use similar methods in balecob building: We place deadmen and metal strapping in all cob pillars, and every few feet along the wall under the top layer of cob. Lay the deadmen on the last course of bales with enough metal strapping to reach beyond the top layer of cob to the roof.
After the walls are up, the cob has dried, and the walls have done any settling they’ll do, it’s time to put on a base coat of earthen plaster. Plastering isn’t just an aesthetic step. Balecob walls derive strength as much from the interlaced cob and plaster between and around the bales as they do from the cob pillars and layers compressing them.
Start by covering the sides of the bales (which have already been “slipped”) with a 1- to 2-inch layer of earthen plaster. You can finish a balecob wall with several layers of earthen plaster, just as you would a straw bale wall, and we find it best to start with a straw-rich plaster that will stick easily and go on smoothly. After the base coat, you can apply layers of finer earthen plaster.
Of course, windows, doors, electric systems, and plumbing systems can all be incorporated into a balecob structure. Do your own research — there are dozens of books and online sources of information about natural building techniques nowadays, though few about balecob specifically — take a workshop, or just play around with the building materials. The beauty of natural building is that it lends itself to experimentation, and to a variety of projects smaller than a whole house or cabin. Why not start with a smaller project, such as a root cellar or cold room, a sauna, animal housing, or a seasonal workshop space?
Thank you!!