Here is an article by Morgan Caraway recently published in www.motherearthnews.com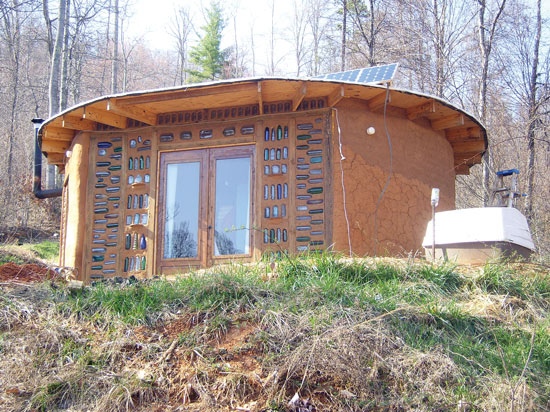 My wife, Mary Jane, and I built our first earthbag home in 2009, after being inspired by the Mother Earth News book Earthbag Building. Our circular house was 20 feet in diameter and incorporated a bottle wall and reclaimed French doors. The build took us less than five months, and the total cost was under $5,000. The structure went viral on social media.
Since then, we’ve worked on many earthbag projects, including an Earthship-inspired domicile and a spring-fed above ground pool featured here. Along the way, we’ve learned a lot about how to streamline the process of building with earthbags.
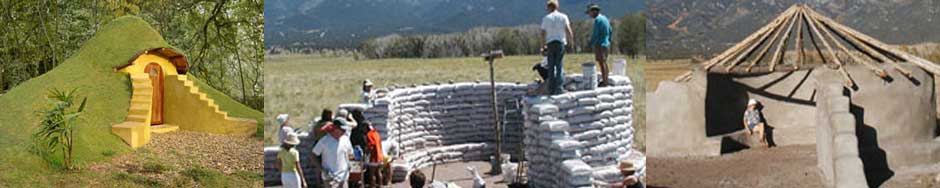
An earthbag structure is made of stacked bags filled with earth. In my experience, this is one of the strongest, most versatile, and yet least expensive natural building techniques. The fill material is readily available almost anywhere, and will be either dirt cheap, or free! Bags filled with soil can be used in high-moisture applications that would be unsuitable for wood, cob, hempcrete, or straw bales. They’re perfect for above- and below ground greenhouses, root cellars, storm shelters, benches, cisterns, and much more. Earthbags are mold-proof, fireproof, bug-proof, bulletproof, and rot-proof. This building medium is strong and adaptable. Consider how long sandbags have been used for flood control and military fortifications.
Building your own home can be an empowering and life-enriching experience! Before I share the earthbag building techniques we’ve used for more than 11 years, note that it’s your responsibility to become familiar with local building codes and proper safety procedures. Use due caution.
A tiny house or similar small structure is a good project for beginners. Start by drawing up plans on graph paper. Our chosen build site for our own earthbag tiny house had been excavated years earlier for a root cellar we’d decided we didn’t need, so the footprint was already established.
Your first major decision for an earthbag project is the type of foundation. The possibilities include a rubble trench, concrete slab, or concrete footer. Foundations incorporating concrete will be more expensive than other options, and have much greater embodied energy, but they’re often required by code departments. Check the building code exceptions in your area. In many places, you can build under a certain square footage without a permit. I believe most localities will approve a post-and-beam structure with earthbag infill on a slab foundation. For our tiny home, we settled on a bermed floating foundation of the type used for Earthship homes.
I used galvanized post bases sunk into reinforced concrete for the footers of the front posts and beam; even pressure-treated posts will rot in our moist climate. We cross-braced the posts to withstand the pressure from the filled bags, and to resist sideways motion.
To draw the inner edge of the back curve of our planned structure, I hammered a short piece of rebar into the ground at the center of the back footprint and, using a nylon rope tied to the rebar at one end and a stick at the other, I drew the inner edge of the curve. Next, I leveled the area.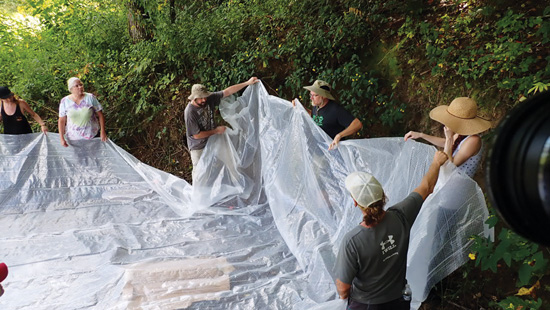
When everything was ready to go at our tiny home build site, we held a workshop. This gave participants valuable hands-on experience before attempting their own earthbag structures, while also providing us with extra hands. To begin the build, we spread a moisture barrier and marked the inner curve of the back wall on top of the barrier with a permanent marker. Always protect the moisture barrier with old sheet plastic, tarps, or staple-free cardboard while you’re working.
We use 14-by-26-inch sandbags for our earthbag builds. After plastering, these bags form a wall that’s 1 foot thick. I usually buy 1,000 or more at a time online. Look for bags with high UV protection. You can buy gusseted bags to ensure the earthbags’ corners don’t project from the surface of the built wall, but they’re harder to find and more expensive. I prefer to diddle the bags by creating a hand-folded gusset, while other builders like to sew the gussets.
Next, fill the bags to about 8 inches from the top. You don’t need to pack the fill. I crouch down at the dirt pile and scoop soil into bags using a shovel with the handle broken off. You can also use 32-ounce metal cans. Whatever you choose to scoop with, consider that you’ll be repeating this motion many times, so do it in a way that’s sustainable for your body.
Take extra time laying the first row of bags, as it will serve as the form for the rest of the structure. Before laying a bag, fold the open top down and under, and then butt it up against the last bag placed. After laying the first couple of rows, make notes on the inside of the bags with a permanent marker to remind you of the height of strip anchors, windows and other forms, and access pipes in the wall. Tamp each row after it’s been laid, and then place two strands of barbed wire on top. We bend in the wires at the ends. We position these wires near the inner and outer edges of the bags to allow for the rebar that’ll be hammered through the courses later. We usually use cordwood to weigh down the wire as we’re laying it, but you can also use long bricks, rocks, or anything with the right length and weight. For a homemade barbed wire stand, we use two large cinder blocks with a 2×2 through the middle of the roll. A large dowel rod or thick branch will also work.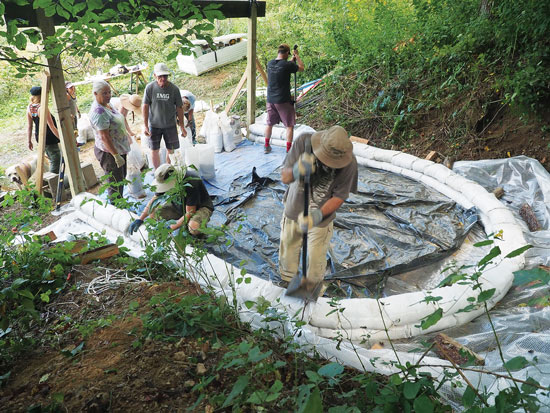
Check plumb and level after laying each course of earthbags. I like to use a foot-long bubble level, which allows me to plumb three rows at once, and I use a long board with the level placed on top to check level. The bags can be scooted and shifted, even after they’ve been tamped. I build and install permanent frames for the window and door spaces to save the trouble of using removable forms, or hard packing the exposed bag ends. I build the frames from 2x10s so the exposed ends will be even with the foot-thick wall after plastering. The weight of bags or roofing over window and door frames means you’ll need strong lintels, and often a sturdy sill below. A lintel helps disperse the weight coming from above that would otherwise distort or crush the frame, possibly preventing the proper opening and closing of windows and doors. My classic lintel is 9-1/2 inches wide (the width of a dimensional 2×10), with 8 to 10 inches of overhang on both ends, where it rests on the bags. 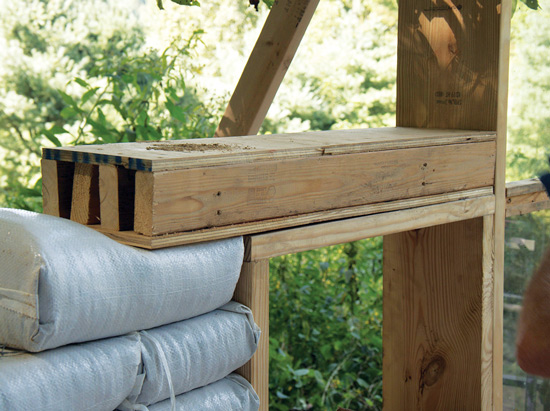
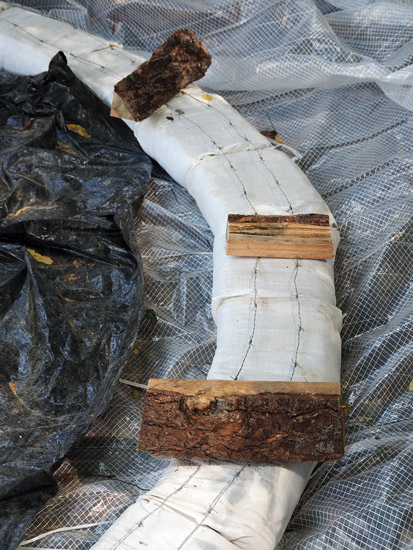
For windows up to 30 inches wide, I sandwich four pieces of 2×4 sideways between 3/4-inch plywood. Wider windows and doors will need stronger support. After laying every foot of wall (that is, three rows of bags), we add strip anchors to connect the wall to the posts and window and door frames. Our strip anchors have a 3/4–inch plywood base with a piece of 2×4 on top (see middle left photo, opposite page). We hammer galvanized nails through the plywood into the bag below, and then screw the 2×4 into the post or frame. You can also use strip anchors to attach anything to the inside of the structure; for example, we placed three strip anchors in the back wall to attach a sleeping loft. To avoid losing sight of the strip anchors when you plaster, leave a bit showing on the wall. For every 3 feet of wall height, we hammer in 1/2-inch rebar. (When installing rebar on the bottom rows, be careful not to puncture the moisture barrier.) After it’s installed, mark the height and location of the rebar on the earthbag wall. When, after another 3 feet of height, you’re ready to install the next sequence of rebar, make sure to punch all the way through the top bag of the underlying rebar sequence for extra reinforcement. The quantity of rebar you use should depend on how much pressure will be against the wall’s exterior, and its inherent stability — about 3 feet apart in circular walls (because “round is sound”) and 2 feet apart in straight walls, which are weaker.
We usually build shed roofs on our earthbag houses, but more complicated options include gable, gambrel (barn style), and hip roofs. Earthbag domes in desert areas usually need no roof other than cement-stabilized plaster, but I don’t recommend this for wetter climates, because the entire outer surface is essentially roof. Ensure that the beams don’t sit directly on your bags, and have a strong support underneath to diffuse the weight. To secure roof structures to earthbag walls, we hammer rebar in an “X” pattern through the wood under the beams or rafters.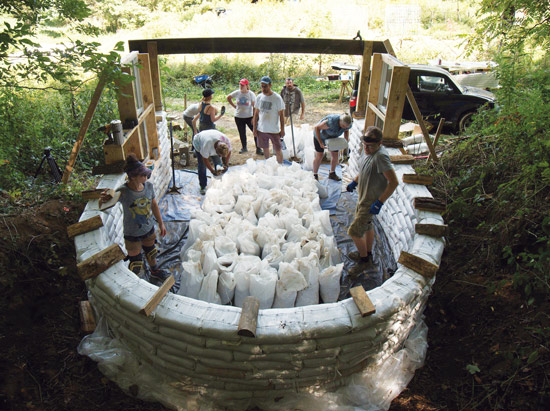
I always attempt to overbuild my earthbag structures. If they aren’t strong enough, they can be dangerous. Another hard lesson I’ve learned is not to always choose the cheapest or easiest option. Some extra money or effort here and there can really pay off. The roof structure of our current earthbag tiny house is three milled 2×10 beams, with milled 2×6 rafters over the top, and a wooden deck of milled 1x material. Above the deck is a moisture barrier, 3 inches of foam board insulation, and purlins and a Galvalume-coated sheet-steel roof.
After the roof is on, the next priority is plastering the exterior to prevent the sun’s rays from degrading the earthbags. The plastering tools we recommend include a wheelbarrow; a masonry hoe or a standard garden hoe; stainless steel pool trowels with rounded edges for doing curves; and plasterer’s hawks or buckets for carrying plaster. We find a Japanese trowel with a pointed tip to be helpful for edge and detail work.
The ideal mix for cob and plaster is 1 part clay to 4 to 6 parts sand. If you’re lucky, your subsoil will already be close to this ratio. To this mix, add some sort of fiber, such as straw (not hay) or cellulose. We also add a bit of borax or washing soda to the mix to inhibit mold growth in the fiber. Do a test patch on your wall to check how well your plaster sticks and holds together. Mixes with too much clay will crack as they dry; those with too much sand will break apart easily. Amend the mix as needed with either clay or sand. Mix it together in a wheelbarrow, in a cement mixer, or on a tarp. Be consistent once you find a good formula.
I apply plaster by trowel in an upward motion, making sure to push the plaster firmly between the bags. Mud can either be pushed or thrown into cracks first, or done all at once. Most folks find working with plaster and cob to be a pleasurable experience, and you can get good at it in just a few days.
With earthbag buildings, it’s easy to build shelves, cabinets, and other functional items directly into the wall. To add a shelf, simply place one on top of a row of tamped bags, and nail it in as you would a strip anchor; then, lay barbed wire over the top as you’d normally do with a course of earthbags. The next row of bags will hold it in place. To make a cabinet, add two or more such shelves to the earthbag wall, one directly above the other; later, close in the sides and install a door.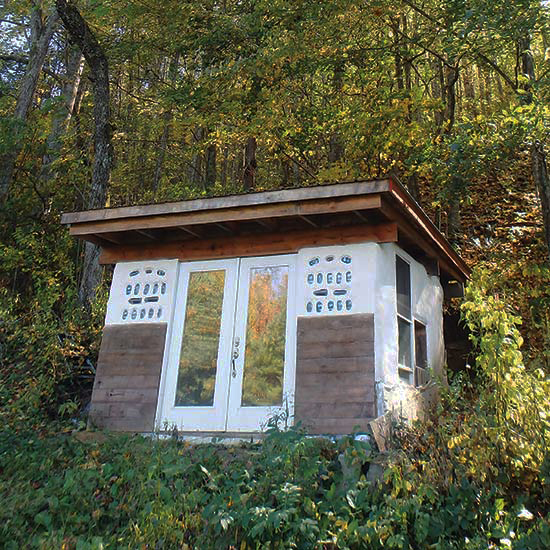
Morgan Caraway is co-founder of the Sustainable Life School and Bottom Leaf Intentional Community. You can find out more about his online course “Building an Earthbag Tiny House,” plus news on upcoming workshops and events, on his website at Sustainable Life School.
You can read the original article at www.motherearthnews.com